Two Color Strat Three Color Strat Fender Sunbursts
|
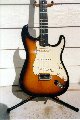
 Introduction In 1954 Fender introduced a guitar that was as revolutionary as the Esquire of 1950.... The guitar was of course the Stratocaster. The guitar was as new and exciting as the infant space program that the name evoked. This was not your fathers guitar! The guitar exists today virtually unchanged. From country to surf to rock, the guitar was and is the instrument that defined the popular musical progression of the last four decades. When introduced in 1954 the three pick-up contoured slab body was chrome and color with enough electronic and mechanical innovations to possibly be considered not an evolution of the guitar but a completely new instrument. The first of these radically new guitars were finished in a two color sunburst with a large white pickguard/pickup/electronics assembly. The two color finish remained unchanged from 1954 to 1957. In 1958 and 1959 red was added in the transition zone to smooth the color change. Until corrected in 1960, the red tended to fade which essentially reverted the finish back to the early two color look. Recreating this look was the goal of a recent customer. A
Two Color Strat....
The body as received was highly figured ash and very light. The production quality was such that very little body preparation was needed. In fact the only sanding done was to remove any oils that may have possibly been on the body due to handling. The body was then filled with a here un-named water based grain filler. The filler was easy to work with and clean up but multiple passes were needed to fill and when over sprayed with lacquer, the filler absorbed the lacquer solution and rose. With respect to the manufacturer, they did say that the water based filler could be used under lacquer but that they recommended their lacquer based filler for lacquer based overspray. Another lesson learned. An oil based filler was then used over the previous filler. After filling and level sanding the burst was applied. Amber water based aniline dye was used to color the burst and enhance the grain pattern (our part #GRAMB1). The dye was mixed in a solution of 1/4 tsp. to 16 oz. of water. After one pass, a second solution was mixed using the same mix of amber to water but with 1/8 tsp. of brown (#GRMBRW) added to slightly "kill" the yellow component. A third wipe of the original solution was then made. The use of the brown is a judgment call. My guess is the 1954 burst color was probably amber but over the years the amber faded giving a more brown look. To my eye the amber alone was very attractive. The burst was then sealed with a 1:4 solution of nitrocellulose to reducer. After drying and lightly wet sanding with #400 the body was ready for the dark brown outer band. The pattern for the 1954 is quite different form its' younger brothers. Later Strats have a wide band of red in the transition zone and a thin band of brown/black around the rim. The early pattern has a wide band of brown which darkens as it moves toward the rim. The "horns" also show less burst. The "sides" are very dark brown and may appear black. The back is a duplicate of the top. The band (GRMBRL) was sprayed with the gun positioned over the center of the burst and pointed outward. (The collector I mentioned earlier believes Fender sprayed from the outside in. He bases this on the fact that the early Fenders had specs of brown/black in the burst area . I'll address this later). The brown band was sprayed with the gun positioned to spray outward with the extreme outside edge sprayed first. The spraying progressively moved toward the center. This spraying technique will by nature give a very dark edge which lightens toward the burst. After the dark band was sprayed the edges were sprayed. The spraying of the edges dictated aiming the gun toward the center. The gun was kept at a ninety degree angle to the edge which virtually eliminated overspray into the lighter areas. A gun angle at more or less than 90 degrees could cause of the flecks of brown observed on some early Strats. After the edge was sprayed the body was subjected to inspection under direct sunlight. Some grain at the edge could be seen. The edge and edge only was sprayed with opaque black lacquer to hide the edge grain. One coat was enough to opaque the edges. The body was then clear coated with McFadden nitrocellulose lacquer. Approximately nine coats of clear were sprayed as detailed in ReRanch 101. After drying the finish was polished to its final luster as also detailed in ReRanch. And
now, One More Color....
Adding another step to the two color burst detailed above, the three color burst can be accomplished by spraying a red aniline dye (our GRREDL) tinted lacquer onto the transition area. The red tint should be sprayed after the amber and the edge zones are sprayed. Spraying the edge zone first will give a guide line to follow when applying the red tint. The red tint should be mixed as follows; Mix the red dye into 1 quart of lacquer reducer or alcohol. From that solution take 1/2 pint and add a teaspoon of lacquer. Spray a scrap sample. If the dye sprays with no flow (if the dye when sprayed appears rough and can even be brushed off the lacquer content is too low) add another teaspoon of lacquer. The goal is to have the dye solution spray smoothly without bonding it so tightly with lacquer that mistakes cannot be removed by light #600 or #800 wet sanding. The spray equipment as well as temperature and humidity will also determine the proper mix. (By now you should have begun to realize that guitar refinishing is much more akin to cooking than rocket science). Once you have the edge and burst areas defined to your satisfaction, spray two coats of clear to "lock" in the color and the pattern. The clear coat will also give you some "breathing room" if the red coat needs to be removed or adjusted. Then, with the body lying flat, spray with the gun pointing from the center of the body outward. Spray the first few passes deeply into the dark zone to get a feel for the process. (Walking around the body as you make the spray passes will allow you to maintain the proper spray attitude and direction). When you feel comfortable with your spray technique slowly move the spray pattern inward. Remember that (as Fender realized in 1958) the overspray will work in your favor. The zone should appear as a subtle blending from amber to red to brown to black. If you accidentally make the zone too wide (and the tint was mixed as described above) you should be able to (when the spray is dry of course) lightly sand off the red and respray. When you feel you are close to the he proper level of "redness" spray a coat of clear over the burst. The lacquer will give you an idea of what the burst will look like when completed. If the red zone appears too light make a few more passes with the red tint and check again with a pass of clear. When satisfied clear coat and polish as described in ReRanch 101. |
|
| Fender Custom Colors | Gibson Specialty Colors | Wood Dye Colors | Clear Coats & Tints |
| Sunbursting Products | Finishing Supplies | ReRanch Custom Colors | Privacy Policy |
| BASIC FINISHING | GALLERY | PRODUCTS | MAIN MENU |