In
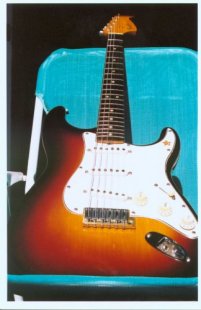
1954 Fender introduced the original Fender Stratocaster in Sunburst. The
'54 Strat was a two color burst with the burst in amber and the edges in
dark brown. There was no real color transition between the two colors because
there was not a noticeable shared color component between the brown and
the amber. Yes, brown does have a red component as does amber but the red
component of the brown was very slight. In 1958 Fender introduced the three
color Strat burst. This burst used amber for the center, a dark reddish
brown stain for the edge and black for the very edge (side if you will).
The first year or so of the three color bursts used a brown dye with a
red component that soon faded and turned the three color burst back
to a two color burst. In 1960 Fender got it right. The three color bursts
lasted through the '60s. In the late sixties Fender changed the burst in
a cost saving move. The bodies were first dipped in a yellow pigmented
Fullerplast filler which tended to somewhat obscure the grain. The red
transition band was also changed. It appears the band was sprayed separately
and the subtle transition of colors found in the 'early '60 burst
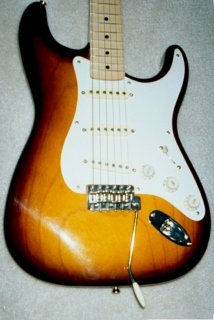
was lost. The ReRanch burst is based on the 1962 burst. This pic of a '54
two color Strat finished with a modified Sunbursting kit was offered by
Joe Steiner.
The
Colors
There are actually
four colors found in the ReRanch three color burst; Amber, Red, Dark Brown
and Black. These four colors come from three separate aerosols. Amber and
black are in separate aerosols. The brown is in a separate aerosol and
the red band is actually the reddish overspray of the brown combining with
the amber of the burst. Since the Brown and Amber are not pigments but
translucent dyes, the completed color application must be clear coated.
The
Products
The cans are
the same 16 fluid oz. aerosols used so successfully with the other ReRanch
products. The Amber Burst aerosol is supplied with the standard cream fan
nozzle. The Medium Brown aerosol and the Black aerosols are supplied with
a new fine tip nozzle. The cream and green colored fine tip nozzle allows
more control in applying the transition zone and the black on the sides.
The nozzle also allows much closer spraying without runs. If there is a
secret to the system it is the fine spray nozzle.
Application
Instructions
The sunburst
application isn't difficult. However, it is suggested that if you make
sunbursting your first adventure in guitar finishing it may be just that;
an adventure. A solid color application may be more advisable for a first
time finisher.
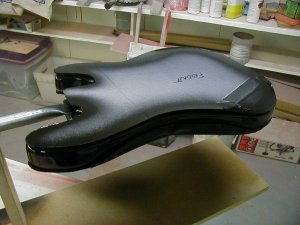
So if you've
made it this far let's get started. After I did the first sunburst to prove
it could be accomplished using aerosols only the kit was supplied to some
brave volunteers to see what faults they could uncover. The accompanying
pics are from the S/B I did as a test and the pics provided by Mike Sonneson
that he used to record the process (Note the spray jig Mike made).
Ash is the traditional
choice of wood to use with a sunburst. The grain is much more pronounced
than alder. Maple is a good choice for sunbursting as well. Applying a
sunburst over a maple capped body will also eliminate the problem of creating
a crisp line between the maple top and the back on Strat type guitars.
The boundary line will be opaqued by the black edge of the burst. If the
wood is ash it must be prepped by applying a grain filler and sand and
sealer. Alder and maple will need a sand and sealer but most likely no
grain filler.
Mahogany can
also be sunburst as exemplified by the sunburst Les Paul Jr. The darkness
of the mahogany may cause a problem in the amber burst area. I have used
the amber dye sunburst color over very light mahogany but on a dark mahogany
a pigmented yellow translucent may be needed for the burst. (Bleaching
the mahogany may also be an option). A grain filler and sand and sealer
will be needed to prep the mahogany before spraying any color. The details
of prepping can be found in the "Solids and Translucents" section of this
site.
After the wood
has been prepped with grain filler (if required) and four coats of sand
and sealer sanded flat the first color is ready to be applied. Most people
have found that a sunburst is best applied with the body laying flat. If
possible lay the guitar on a small table or raised base that allows you
to walk completely around the body.  Paper
can be used to protect the base from overspray. The body should also be
raised an inch or two off the base to prevent the body from sticking to
the paper and also to reduce hard spray lines. Wood blocks inserted into
the pickup and Tremolo cavities can be used as supports. For a Statocaster
style body the first color to apply is the black edge. Why does the black
go down first? It is the only color applied while spraying inward making
overspray into the burst area inevitable. To reduce this over spray cut
a piece of cardboard the size and shape of the body and cover all but the
edges. In the areas of the body contours the cardboard can be folded downward
to offer better protection. DO NOT TAPE the cardboard. Taping will cause
hard paint lines with no feathering of the color. Spray the black edge
using the fine tip round pattern tip (cream with green insert). The black
should be applied to the very edge (side) of a Strat and extend onto the
face of the body only about 1/2 to 3/4 of an inch. The remaining width
of the dark edge will come from the brown application.
Paper
can be used to protect the base from overspray. The body should also be
raised an inch or two off the base to prevent the body from sticking to
the paper and also to reduce hard spray lines. Wood blocks inserted into
the pickup and Tremolo cavities can be used as supports. For a Statocaster
style body the first color to apply is the black edge. Why does the black
go down first? It is the only color applied while spraying inward making
overspray into the burst area inevitable. To reduce this over spray cut
a piece of cardboard the size and shape of the body and cover all but the
edges. In the areas of the body contours the cardboard can be folded downward
to offer better protection. DO NOT TAPE the cardboard. Taping will cause
hard paint lines with no feathering of the color. Spray the black edge
using the fine tip round pattern tip (cream with green insert). The black
should be applied to the very edge (side) of a Strat and extend onto the
face of the body only about 1/2 to 3/4 of an inch. The remaining width
of the dark edge will come from the brown application.
 To
reduce overspray on the body spray the edge with the aerosol pointing downward
and try to avoid spraying into the space between the body and the shield.
Once the black has been applied and dried remove the shield. You may find
that despite the shield some over spray made its way into the burst area.
Since the black is the only color applied so far it will be simple to remove
the speckles by lightly sanding them out with #220 or #320 dry sand paper.
Any variations of the width of the of the dark band can be corrected now
as well. Of course you could spray the black with no protection and accept
the speckles as part of the sunburst. If you look closely at an original
'60s burst you will discover see that Fender did.
To
reduce overspray on the body spray the edge with the aerosol pointing downward
and try to avoid spraying into the space between the body and the shield.
Once the black has been applied and dried remove the shield. You may find
that despite the shield some over spray made its way into the burst area.
Since the black is the only color applied so far it will be simple to remove
the speckles by lightly sanding them out with #220 or #320 dry sand paper.
Any variations of the width of the of the dark band can be corrected now
as well. Of course you could spray the black with no protection and accept
the speckles as part of the sunburst. If you look closely at an original
'60s burst you will discover see that Fender did.
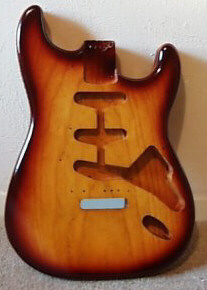
The amber burst
color can now be applied. 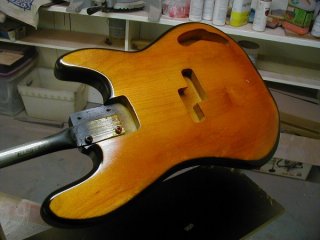 Use
the cream fan pattern nozzle to apply the burst color. Note that the nozzle
insert can be rotated to give a horizontal or vertical spray pattern. Use
the setting that is most comfortable to you. When applying the amber don't
worry if you get overspray on the black band. The amber is strong enough
to color the wood but not the black edge. This pic from Mike shows the
band and amber. After the amber has been applied apply a couple of coats
of clear. The clear does two things. It gives a protective layer over the
amber that may allow any overspray or "ooops" to be sanded off with out
sanding into the amber and the clear will also reveal the true color of
the amber. If you feel it needs to be darker adjustments can be made over
the clear coats.
Use
the cream fan pattern nozzle to apply the burst color. Note that the nozzle
insert can be rotated to give a horizontal or vertical spray pattern. Use
the setting that is most comfortable to you. When applying the amber don't
worry if you get overspray on the black band. The amber is strong enough
to color the wood but not the black edge. This pic from Mike shows the
band and amber. After the amber has been applied apply a couple of coats
of clear. The clear does two things. It gives a protective layer over the
amber that may allow any overspray or "ooops" to be sanded off with out
sanding into the amber and the clear will also reveal the true color of
the amber. If you feel it needs to be darker adjustments can be made over
the clear coats.
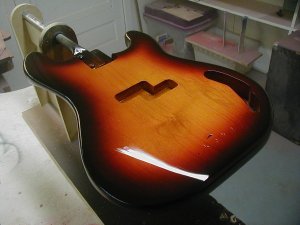
 With
the amber burst and black band applied the red/brown transition zone is
ready to be sprayed. As noted the red and the brown come from one aerosol.
The dark brown is achieved with multiple spray passes and the red color
comes from the overspray of the brown combined with the red component of
the amber. To apply the transition zone the guitar should remain in the
horizontal, supported position. Unlike the black band the brown band is
sprayed outward. Use the fine round pattern cream/green nozzle. A few practice
runs are suggested to get the feel of the spraying technique. Here are
a few hints. Spray the brown zone with one half of the spray pattern falling
off the edge of the body. You will find that you can spray at a closer
range with the fine tip than you can with a normal spray nozzle. The closer
you hold the can to the body the narrower will be the band. I've found
that you can spray at a minimum distance of about six inches with the fine
tip. Be aware that spraying too many passes at close range increases the
chances of runs. It is best to spray one or two passes and let the color
dry for a few minutes before spraying more passes.
With
the amber burst and black band applied the red/brown transition zone is
ready to be sprayed. As noted the red and the brown come from one aerosol.
The dark brown is achieved with multiple spray passes and the red color
comes from the overspray of the brown combined with the red component of
the amber. To apply the transition zone the guitar should remain in the
horizontal, supported position. Unlike the black band the brown band is
sprayed outward. Use the fine round pattern cream/green nozzle. A few practice
runs are suggested to get the feel of the spraying technique. Here are
a few hints. Spray the brown zone with one half of the spray pattern falling
off the edge of the body. You will find that you can spray at a closer
range with the fine tip than you can with a normal spray nozzle. The closer
you hold the can to the body the narrower will be the band. I've found
that you can spray at a minimum distance of about six inches with the fine
tip. Be aware that spraying too many passes at close range increases the
chances of runs. It is best to spray one or two passes and let the color
dry for a few minutes before spraying more passes.
When
spraying the brown zone hold the can over the center of the burst and spray
outward. After ever two or three passes check the nozzle for paint build
up which could cause a drip. Spray the body in quarters. That is, stand
on the lower side of the body and spray the top. Step to the tailpiece
end and spray the horns. Step to the top and spray the bottom side. Step
to the horns and spray the tailpiece end. When spraying the band I found
that about two passes per edge and one trip around the body followed by
about five minutes drying time would avoid runs. About twelve passes gave
a dark brown (almost black at the black/brown line) color and a good red
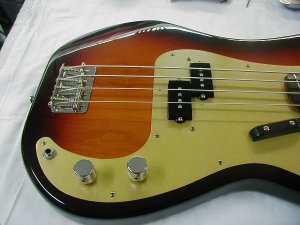
zone. 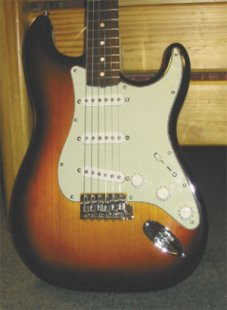 As
for achieving the proper spray pattern, let the body be your guide. If
you keep the spray pattern half on and half off the body the traditional
strat burst pattern will appear. The trickiest areas are the horns but
if you trace the edge of the body through the horn area you should have
no trouble. If you prefer a wider red zone you can move the can away from
the body and make one or two passes with the pattern falling fully onto
the body. You may want to spray a few coats of clear before making this
adjustment. The clear will reveal the finished color pattern and you may
find that the red area is actually already correct. Here is a Strat done
by Cliff Kuhlman, one from Tom Lipp and a close up of the P Bass
as finished by Mike.
As
for achieving the proper spray pattern, let the body be your guide. If
you keep the spray pattern half on and half off the body the traditional
strat burst pattern will appear. The trickiest areas are the horns but
if you trace the edge of the body through the horn area you should have
no trouble. If you prefer a wider red zone you can move the can away from
the body and make one or two passes with the pattern falling fully onto
the body. You may want to spray a few coats of clear before making this
adjustment. The clear will reveal the finished color pattern and you may
find that the red area is actually already correct. Here is a Strat done
by Cliff Kuhlman, one from Tom Lipp and a close up of the P Bass
as finished by Mike.

 In
1954 Fender introduced the original Fender Stratocaster in Sunburst. The
'54 Strat was a two color burst with the burst in amber and the edges in
dark brown. There was no real color transition between the two colors because
there was not a noticeable shared color component between the brown and
the amber. Yes, brown does have a red component as does amber but the red
component of the brown was very slight. In 1958 Fender introduced the three
color Strat burst. This burst used amber for the center, a dark reddish
brown stain for the edge and black for the very edge (side if you will).
The first year or so of the three color bursts used a brown dye with a
red component that soon faded and turned the three color burst back
to a two color burst. In 1960 Fender got it right. The three color bursts
lasted through the '60s. In the late sixties Fender changed the burst in
a cost saving move. The bodies were first dipped in a yellow pigmented
Fullerplast filler which tended to somewhat obscure the grain. The red
transition band was also changed. It appears the band was sprayed separately
and the subtle transition of colors found in the 'early '60 burst
was lost. The ReRanch burst is based on the 1962 burst. This pic of a '54
two color Strat finished with a modified Sunbursting kit was offered by
Joe Steiner.
In
1954 Fender introduced the original Fender Stratocaster in Sunburst. The
'54 Strat was a two color burst with the burst in amber and the edges in
dark brown. There was no real color transition between the two colors because
there was not a noticeable shared color component between the brown and
the amber. Yes, brown does have a red component as does amber but the red
component of the brown was very slight. In 1958 Fender introduced the three
color Strat burst. This burst used amber for the center, a dark reddish
brown stain for the edge and black for the very edge (side if you will).
The first year or so of the three color bursts used a brown dye with a
red component that soon faded and turned the three color burst back
to a two color burst. In 1960 Fender got it right. The three color bursts
lasted through the '60s. In the late sixties Fender changed the burst in
a cost saving move. The bodies were first dipped in a yellow pigmented
Fullerplast filler which tended to somewhat obscure the grain. The red
transition band was also changed. It appears the band was sprayed separately
and the subtle transition of colors found in the 'early '60 burst
was lost. The ReRanch burst is based on the 1962 burst. This pic of a '54
two color Strat finished with a modified Sunbursting kit was offered by
Joe Steiner.