Products Guitar Gallery Discussion Board Main Menu 

|
 In this section we will explore the intriguing world of aniline dyes and how they can add beauty to your next project. Introduction
Other products will be discussed in this section that are needed in the preparation of the wood. They are sand paper, oil based grain filler and sand and sealer. The sand paper grades needed for the preparation are grades #180, #220 and #320 with #320 being the finest. All prep sanding should be done using dry sand paper. This will eliminate the risk of introducing moisture into the wood. Grain filler is a thin wood filler like material. The thinner viscosity allows it to penetrate and hold in the grain pits. Normal wood filler will pull out of the grain as it is applied. Grain filler is difficult to find although Wood Craft Stores and other fine wood working stores will carry it. Bartley's is oil based and a good one. It is the one that you will most likely find. (Of course The ReRanch offers a good grade oil based filler as well). Water based fillers are available but have the inherent problem of introducing moisture into the wood. Lastly, sand and sealer is recommended with all woods destined for a perfectly glass-flat glossy finish. Sand and sealer is a high solids content lacquer, vinyl or shellac filler that helps fill the grain but also acts as a leveler for the coats above it. Each product as it is used on a particular wood is discussed below. Water
based Vs. Alcohol based Dyes
The water based
dyes are reputed to be more color fast than the alcohol reduced dyes. I
say reputed as I have found the color fastness of the alcohol types to
be a non issue. Gibson and PRS use alcohol reduced dyes to tint their translucent
finishes and fading doesn't seem to be much of a problem to these manufactures.
It should not cause great concern for the one off custom builder either.
Water based
dyes can only be applied to unfinished and unsealed wood whereas alcohol
based dyes can be either wiped onto unfinished wood or sprayed over filled
and sealed wood. Water based dyes cannot be successfully sprayed over sealed
wood.
Dye
Selection
Some colors
are not available in both water and alcohol based. If your chosen color
is not available in a water based dye don't let the possibility of streaking
cause you to abandon your preferred color choice. In normal temperatures
alcohol will evaporate slowly enough to allow you adequate application
time.
As hinted at
above, wiping on water based dyes may not be the best application
method. The problem lies with the choice of wood the dye is to be applied.
Remember, water based dyes can be used only on raw and un sealed wood.
On woods requiring filling and/or sand and sealing the prep work must be
done over the dyed wood. This prep work offers a high potential for sanding
through the prep coats and into the dyed wood. Sand throughs will sand
away the dye and leave a light spot. Sometimes these spots can be re-dyed
but it is difficult to dye the spot back to the hue of the surrounding
area. For this reason I suggest that wiping on dyes be reserved only for
a wood that requires little or no filling. In the guitar world that limits
wiping on dyes to maple.
For the rest
of the woods in our world spraying the dye over the prepped wood is the
best choice. Since water based dyes cannot be sprayed over prepped wood
that leaves us with alcohol based dyes.
Mixing
and Applying Dyes
When working
with water based dyes you may find that the solution will raise the grain
of the raw wood. To minimize the grain raising wipe the wood first with
a damp cloth or sponge. When dry you can sand the raised grain off using
the last grade paper used in the sanding schedule to prep the wood.
Wearing gloves,
you can now wipe on the color. Dip an absorbent cotton cloth (old tee shirts
work great) into the dye solution and working with the grain wipe the color
onto the wood. If the color doesn't appear dark enough you can either wipe
on more solution or strengthen the solution by adding more powered dye.
The dye will appear flat and may appear blotchy as it dries. Don't worry.
The true beauty will become evident when it is clear coated. If you get
the color too dark a clean moist rag can be used to remove dye. When dry
do not sand and try not to handle the body more than you need to. Allow
to dry thoroughly. Clear coating will follow.
The mixing of
alcohol dyes follows the basic steps noted above. The alcohol dyes are
offered in 2 ounce quantities. Two ounces of dry dye will make 1 1/2 to
2 quarts of strong solution. Again mix a solution using 1/2 of the dye.
Denatured alcohol is recommended by Homestead. I've found that lacquer
thinner seems to work well also. When wiping alcohol based dry solution
wipe in a cool area to retard evaporation. Streaking is a possibility but
not as great of a problem as you may imagine. If you do see streaking wiping
again with a rag dampened with denatured alcohol can be used to blend the
streaking.
The real advantage
of alcohol based dyes is that they can be sprayed. Three colors; Cherry
Red, Blue and Neck Amber are offered by the ReRanch in aerosols. For the
other colors a Preval Unit can be used to spray them. A Preval is a disposable
aerosol system. They are available at most home supply super stores and
many hardware stores. Home Depot sells them for about $4.
Woods
and Wood Prep
Maple is used
for caps on Les Paul, PRS and custom Strat and Tele after market bodies.
Many other builders use maple as the outer laminate on hollow body and
semi hollow body guitars such as the Gibson Es335. Because of its weight
it is seldom used alone for solid body guitars. Maple is a very dense wood
and as such needs little in the way of grain filling. The absence of the
need for grain filling makes maple the prime candidate for the use
of water based dyes. The raw wood should be sanded starting with either
#180 or #220 dry sand paper. When sanding with any paper below #220 be
especially careful not to sand across the grain. It is very tempting in
some areas such as around the arch on the top of a Les Paul to cross sand.
Don't! Cross sanding can put scratches in the wood that may appear invisible
until dyed. The dye will find the end grain in the scratch and reveal it.
If you find scratches after the dye has been applied resanding is usually
the only way to correct them.
Birdseye maple
and flamed maple can be enhanced through the use of dyes. To bring out
the figuring in the wood wipe the wood with a diluted mixture of either
amber or medium brown dye. When dry lightly sand the wood back with #220
or #320 dry sand paper. The field of the wood will sand back to the natural
maple color but the dye will remain in the figuring.
Along these
same lines, flamed maple can be enhanced by pre-dying with either black
or a strong solution of color. For example a blue flamed maple top can
be pre dyed either black or dark blue. The darkness of the blue should
be several shades darker than is intended for the final color. After applying
the darker color and allowing it to dry, sand the wood back to the point
that the field is natural but the grain is stilled dyed. If you are doing
a burst you can sand more in the center of the body and make the grain
color lighter there than at the edges. This gives the effect of having
the flames appear to burst into the center of the body. The pre-dying technique
can also be used to enhance the grain of alder and basswood although the
effect may be less striking. After the pre-dying has been done the body
can be wiped with a solution close to the color of the dyed finish. If
the color isn't dark enough additional dye can be added through further
wipings. If the dye is too dark much of the color can be removed with a
clean damp cloth.
[An aside; PRS
has popularized the natural binding look on maple capped guitars. If you
are spraying the dye creating natural bindings is simple; after prepping
the body to the sand and sealer stage tape the binding line and spray the
dye. Remove the tape and clear coat. If you are wiping on the dye it becomes
trickier. You can try to tape the area you want to be the binding but the
problem is the dye may migrate through the wood and go under the tape giving
a ragged binding line. For a crisp line first tape on either side of the
binding line to be. Then spray clear lacquer over the binding area. When
dry remove the boundary tapes and tape the binding line. You can now wipe
on the dye. Even if the dye does get under the tape the sealer will prevent
the dye from staining the binding.]
Alder is a little
less porous than maple and depending on the particular piece of wood may
require differing degrees of preparation. If the grain appears open to
your eye it will need a grain filler. Some alder is tighter grained and
may not. If you determine a grain filler is needed you can use a natural
colored filler to fill the grain. After sanding the raw wood to #220 or
#320 (Note: all sanding should be done using a sanding block where possible)
wipe on the filler. The filler should be the consistency of warm peanut
butter. A rag can be used to wipe it on but I've found that smearing it
into the grain with my fingers works best for me. After applying the filler
wait about ten minutes for the filler to set. You can save yourself a lot
of sanding if you then use a rag damp with mineral spirits to remove the
excess. After letting the filler dry for an hour or so repeating the application
will assure you of a good fill. Wipe again with mineral spirits and let
dry overnight. The filler can be sanded flat starting with #180 and finishing
with #220 or #320 dry. The goal of the sanding is to remove all of the
filler in the field (the light area of the wood) of the wood leaving the
filler in the grain pits only. Dyes can be wiped on alder over the filled
and sanded wood but sanding through may occur during the next step.
After filling
(or not filling if it was decided it wasn't needed) a sand and sealer coat
should be applied. Sand and sealers are a high solids content lacquer,
vinyl or shellac product that gives not only additional grain filling
but provides a level surface for the following coats. They can be brushed
on or sprayed. Spraying results in a much more even coat and as such is
much easier to sand flat. Apply a minimum of four coats of sand and sealer.
Spray two coats separated by at least ten to twenty minutes and let dry,
preferably overnight. Sand the first two coats flat. The goal is to remove
as many of the shiny spots as you can without sanding back into the wood.
Use #220 dry and you should get about 80% of the shiny spots. When sanded
apply two more coats. When dry sand flat with #220 and finish with #320.
This time sand out all of the shiny pots. If there are a few that seem
too deep to sand out you can either respray that area or drop fill and
sand out the more persistent ones.
If you opted
to use an alcohol based dye on the alder, spraying the dye is next. Some
of the more popular colors are available from The ReRanch in aerosol sprays.
For the colors that are not available in aerosols they can be mixed and
sprayed with a Preval Unit. One unit will be enough for a guitar body.
Using either method (or a spray gun) spray light dye coats avoiding overlaps
if possible. Don't try to reach the end color in one or two passes. Depending
on the strength of solution and the desired end color 4 to 10 passes may
be needed. Dyes may appear flat and blotchy when first sprayed. Clear coating
will be needed to reveal the true color and depth of the finish. As you
approach the desired final color shoot a coat of clear to give you a truer
reading of the color. If the color isn't dark enough additional color passes
can be sprayed and checked again by spraying a coat of clear. When the
final color is reached finish with the clear coating schedule; usually
about nine to fifteen coats.
Ash is the most
porous of the white woods and must be grain filled. If you try to skip
this step hoping that the lacquer will act as a filler you can get a short
term acceptable finish. As the lacquer dries without a filler as a base
it will sink into the grain leaving a pot marked finish. The sinking of
the lacquer will occur in a matter of weeks. Follow the grain filling schedule
above to protect the lacquer from drying back into the grain. Normally
a natural colored filler is used on ash but stained fillers can be used
to highlight the grain. After filling the grain a sand and sealer should
be applied followed by a sprayed on color coat and clear coats. As with
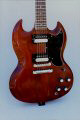
alder spray nine to fifteen coats of clear. Two species
of wood fall into the family guitar builders call "Honduran Mahogany";
mahoganni
and swietenia. Mahoganni is
the dark mahogany Gibson used for the original SGs and L/Ps that we know
and love. It is very rare today. The second species, swietenia,
while called Honduran is actually from Brazil and much lighter than true
mahogany. Most likely a new mahogany guitar would be built using the lighter
Brazilian species. Because of the darkness of the wood the use of dyes
on mahoganni and swietenia (to a lesser degree) is limited.
"Woody" colors such as mahogany and walnut work well on both species but
colors like yellow and blue may not. Red will give a wine color (like an
SG) to true mahogany but may give a redder color on the lighter swietenia.
Test first before committing to a color.
When dying both types of
mahogany some success with obtaining a true color can be had if the wood
is bleached first. If you must have a blue mahogany guitar try an A/B bleach
Like the Parks Corp. wood bleach. Home Depot has it for less than $10.
Filling mahogany offers a
special challenge. The grain filler used must be stained darker than the
wood. Pre stained fillers are available from Bartly's and can be found
at fine woodworking stores. You can also make a dark filler using a natural
oil based filler. Oil based fillers can be stained with an oil based stain
such as Minwax or Sherwin Wood Stain. The advantage of making your own
is the color is limited only by the colors of wood stains available. Let
your imagination be your guide.
When using a stained filler
the wood must either be protected form the stain or sanded completely back
to the field of the wood after the filler is applied. To protect against
staining the wood any darker than it is naturally (older Les Pauls come
to mind here), seal the wood first with a coat of clear lacquer. When dry
apply the stained wood filler. The lacquer will leave the grain open but
will leave a sealer coat on the rest of the surface. When the filler has
set (ten to twenty minutes) wipe off the excess filler using mineral spirits.
Mineral
spirits will dissolve the excess filler but not the lacquer which will
prevent the stain in the filler from staining the wood. After two applications
of filler spray with sand and sealer, Spray your color and clear..
The spraying of the clear
coats and final polishing can be found in ReRanch 101.
|
|
| Fender Custom Colors | Gibson Specialty Colors | Wood Dye Colors | Clear Coats & Tints |
| Sunbursting Products | Finishing Supplies | ReRanch Custom Colors | Privacy Policy |
| BASIC FINISHING | GALLERY | PRODUCTS | MAIN MENU |